
How to Edit Photos in Canva Understanding can change your approach to digital design In the field of digital creativity, Canva has emerged as a beacon for those who want to enhance their visual content.
Especially when it comes to editing photos, Canva offers a user-friendly platform full of possibilities. This guide aims to highlight the simplicity and effectiveness of using Canva to edit photos.
Whether you’re an experienced designer or a newbie looking to add charm to your images, with its intuitive interface and a wide range of tools, Canva makes photo editing accessible to everyone.
What’s in this article?
- 1 Why is the Canva photo editor so popular?
- 2 How to Edit Photos in Canva Like a Pro?
- 2.1 1. Editing Photos in Canva: The Basics
- 2.2 2. Removing Image Background in Canva
- 2.3 3. Adjust Brightness
- 2.4 4. Adjust Contrast
- 2.5 5. Editing a Photo using Canva’s Adjust Feature
- 2.6 6. Cropping Images in Canva
- 2.7 7. Replacing Background Photo
- 2.8 8. Flipping Photos
- 2.9 9. Resize Photo
- 2.10 10. Adjusting Photo Size for Different Platforms
- 2.11 11. Applying Filters
- 2.12 12. Making a Collage
- 2.13 Is Canva Useful for Logos and Editing Photos?
- 2.14 Inserting a Logo on Top of a Photo in Canva
- 2.15 Editing Images on Canva:
- 2.16 Is Canva the Best for Photo Editing?
- 2.17 Can You Edit Images with Layers on Canva?
- 2.18 Editing Out a White Background from an Image in Canva:
- 3 FAQs: How to Edit Photos Like a Pro in Canva?
- 4 Final Thoughts:How to Edit Photos Like a Pro in Canva?
Why is the Canva photo editor so popular?
The Canva photo editor has gained immense popularity due to its user-friendly interface, making it accessible for both beginners and professionals.
Its vast library of templates, illustrations, and fonts allows for quick and creative customization of images, catering to various design needs. Canva’s versatility extends beyond basic photo editing to include features for graphic design, social media content, and marketing materials.
This all-in-one solution, combined with its affordability and cloud-based platform, makes it an attractive tool for individuals and businesses alike. Its continual updates with new features and assets keep it relevant and highly useful in a dynamic digital landscape.
1. Professional Appearance Made Easy
- Wide Range of Templates: Canva offers thousands of professionally designed templates for various purposes, from presentations to flyers, making it easy to create high-quality designs.
- Customization: Users can customize these templates to their needs, ensuring their designs look unique and professional.
- Branding: Canva allows the integration of brand elements like logos, color schemes, and fonts, which is crucial for businesses to maintain a consistent and professional image.
2. Enhancing Social Media Presence
- Social Media Optimization: Canva provides specific design sizes optimized for different social media platforms, ensuring that the visuals look perfect on any channel.
- Trendy Designs: The tool stays updated with the latest design trends, enabling users to create modern and engaging content for their social media audiences.
- Engagement Tools: Features like the ability to add animations and interactive elements can make social media posts more engaging and shareable.
3. Precision in Editing
- Advanced Editing Tools: Beyond basic adjustments, Canva offers features like photo effects, filters, and advanced color correction, helping in fine-tuning images to correct specific features.
- Retouching Capabilities: Users can retouch photos to enhance quality or alter appearances, which is particularly useful for professional headshots or product photos.
4. Versatility in Resizing and Adaptability
- Resize Feature: Canva’s Magic Resize tool allows users to instantly adapt their designs for different formats, saving time and effort.
- Multiple Purposes: Whether it’s for digital use or print, Canva’s versatility covers a wide range of needs, from creating website graphics to designing print materials like brochures and business cards.
Types of Canva Photo Edits:
- Brightness Adjustment: Modify the lightness or darkness of your photo.
- Contrast Tuning: Enhance or reduce the difference between darks and lights.
- Saturation Control: Adjust the intensity of the colors in your image.
- Color Balancing: Tweak the overall color tone.
- Sharpening Details: Make your photo look crisper.
- Adding Filters: Choose from a variety of preset filters.
- Layering Elements: Add text, shapes, or other photos.
How to Edit Photos in Canva Like a Pro?
1. Editing Photos in Canva: The Basics
- Access Canva: Visit the Canva website or app.
- Account Creation or Login: Begin by either creating a new account or logging into your existing Canva account.
- Design Type Selection: Next, opt for the ‘Edit Photo’ option from the ‘Create a Design’ menu.
- Upload Your Photo: Click on ‘Uploads’ to add your image to Canva.
- Select the photo for editing: Click on your uploaded photo to bring it onto the canvas.
- Explore Basic Tools: Familiarize yourself with tools like crop, resize, brightness, and contrast.
- Make Basic Adjustments: Use these tools to make initial edits to your photo.
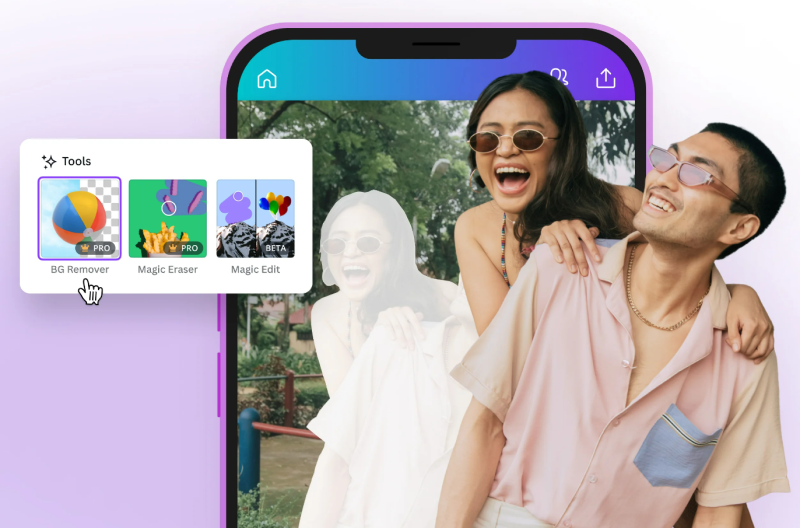
2. Removing Image Background in Canva
- Start a New Design: Choose a blank design or template.
- Upload your image: Begin by uploading the image from which you wish to remove the background.
- Add the image to Canvas Next: click on the uploaded image to incorporate it into your design.
- Select the image: Click on the image positioned on the canvas.
- Access the Effects Panel: Finally, navigate to the ‘Effects’ option located in the upper toolbar.
- Choose Background Remover: Select the ‘Background Remover’ tool.
- Apply and Adjust: Wait for Canva to process the image, and make manual adjustments if necessary.
3. Adjust Brightness
- Choose your photo: Begin by clicking on the photo within your design.
- Open the Adjustment Panel: Begin by clicking the ‘Adjust’ button on the top toolbar.
- Locate the Brightness Slider: Inside the adjustment panel, find the brightness slider.
- Increase Brightness: Slide to the right to brighten the photo.
- Decrease Brightness: Slide to the left to darken the photo.
- Preview Changes: Observe changes in real time as you adjust the slider.
- Finalize Edit: Click ‘Apply’ to save changes.
4. Adjust Contrast
- Select the photo: Click on your image on the canvas.
- Open Adjust Menu: Access the ‘Adjust’ options.
- Locate the Contrast Slider: Find the contrast slider in the menu.
- Enhance Contrast: Slide right to increase contrast.
- Reduce Contrast: Slide left to decrease contrast.
- Assess the Effect: View the effect of changes instantly.
- Apply Changes: Click ‘Apply’ to finalize the contrast adjustment.
5. Editing a Photo using Canva’s Adjust Feature
- Select your photo: Choose the photo you wish to edit.
- Access Adjustment Options: Click ‘Adjust’ in the toolbar.
- Explore Sliders: Familiarize yourself with different sliders like saturation, tint, blur, etc.
- Adjust Saturation: Increase or decrease color intensity.
- Modify Tint: Add a color tone to your photo.
- Apply Blur Effect: Use the blur slider for background softening.
- Experiment with the X-Process: Try out the X-Process for a cross-processed effect.
6. Cropping Images in Canva
- Choose Crop Tool: Select ‘Crop’ from the editing toolbar.
- Adjust Crop Frame: Drag the corners of the crop frame.
- Preview Cropped Area: See the area that will remain after cropping.
- Reposition Image: Move the image within the crop frame if needed.
- Apply Crop: Click ‘Done’ to apply the cropping.
- Adjust Composition: Rearrange other design elements if necessary after cropping.
7. Replacing Background Photo
- Open Your Design: Select the design with the photo.
- Choose the image: Click on the image whose background you want to replace.
- Remove Existing Background: Use the ‘Background Remover’ tool if necessary.
- Upload a New Background: Add the new background image to your uploads.
- Add New Background to Canvas: Drag the new background image onto the canvas.
- Adjust the new background: Resize and reposition it as needed.
- Layer Your Original Image: Bring your original image to the front, over the new background.
8. Flipping Photos
- Choose the photo: Start by clicking on the photo that you wish to flip.
- Access Flip Options: Then, navigate to the editing toolbar and click on the ‘Flip’ option.
- Select Flip Direction: Finally, choose between ‘Flip Horizontal’ or ‘Flip Vertical’ to determine the flipping direction.
- Apply the Flip: Click on your choice and see the photo flip instantly.
- Adjust Position: Reposition your photo if necessary after flipping.
- Check Alignment: Ensure all elements are properly aligned post-flip.
- Finalize the edit: Click ‘Apply’ to save your changes.
9. Resize Photo
- Select Photo: Click on the photo in your design.
- Access the Resize Tool: Start by clicking on the ‘Resize’ option located at the top.
- Specify Dimensions: Then, either input your preferred width and height or select a preset size according to your requirements.
- Apply New Size: Click ‘Resize’ to change the dimensions.
- Adjust Photo Positioning: Rearrange the photo to fit the new size.
- Maintain Aspect Ratio: Ensure the aspect ratio is correct to avoid distortion.
- Save Changes: Apply and save the resized photo.
10. Adjusting Photo Size for Different Platforms
- Identify Platform Requirements: Know the specific size requirements for the platform you’re targeting.
- Select the photo: Click on your image in Canva.
- Access the Resize Feature: Choose the ‘Resize’ tool.
- Input Custom Dimensions: Enter the dimensions needed for the specific platform.
- Preview the resize: Check how the photo looks in the new size.
- Make the necessary adjustments: crop or reposition the photo as needed.
- Save or Download: Finalize and save or download the photo for the platform.
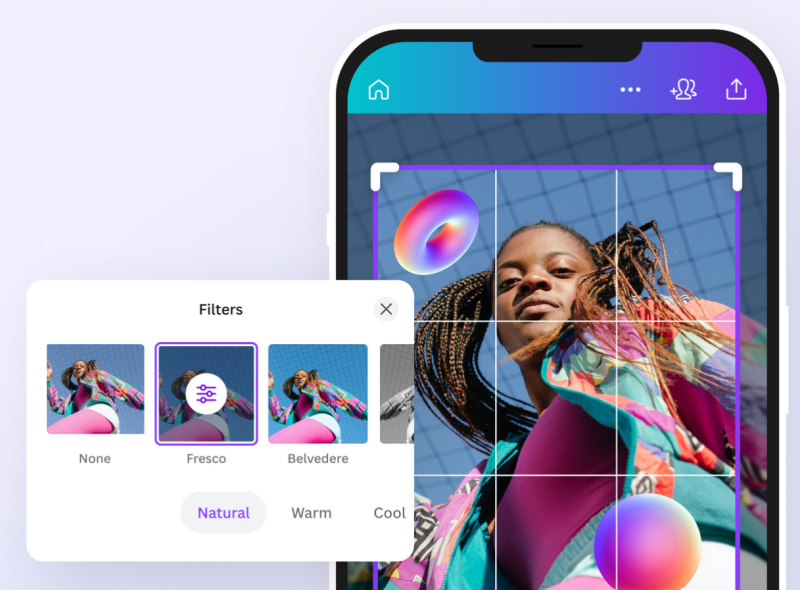
11. Applying Filters
- Open Filter Options: Click on ‘Filters’ in the top editing toolbar.
- Browse Filter Choices: Scroll through and preview different filters.
- Choose Filter: Select a filter.
- Adjust Intensity: Fine-tune its intensity with the slider.
- Compare Before and After: Toggle the before and after views to compare.
- Apply the filter: Confirm your choice and apply the filter.
12. Making a Collage
- Choose a Collage Template: Start with a pre-designed collage template.
- Upload Photos: Add your chosen photos to Canva.
- Drag Photos to Template: Place each photo in the desired spot in the collage.
- Resize and Reposition: Adjust each photo within its frame.
- Edit Individual Photos: Apply any necessary edits to each photo.
- Add Text or Elements: Enhance your collage with text or graphic elements.
- Finalize Your Collage: Once satisfied, save or download your completed collage.
Is Canva Useful for Logos and Editing Photos?
For logos: Yes, Canva offers numerous templates and design elements that make it a handy tool for creating logos, especially for those without advanced graphic design skills.
For Photo Editing: Canva is also effective for photo editing, offering basic to intermediate editing tools like filters, adjustments, cropping, and more. Here are best 10 canva hacks tips tricks to Help You Use Canva Photo Editor More Effectively.
Inserting a Logo on Top of a Photo in Canva
Upload your logo: Go to “Uploads” and upload your logo file.
Add the logo to your design: Click on the uploaded logo to add it to your canvas.
Position and Resize: Drag your logo to the desired position on the photo and resize it as needed.
Editing Images on Canva:
Choose your image: Upload your image or select one from Canva’s library.
Use Editing Tools: Use the options in the toolbar to crop, apply filters, adjust brightness, contrast, saturation, etc.
Add Elements: Enhance your image with text, shapes, or other graphics.
Is Canva the Best for Photo Editing?
While Canva is highly versatile and user-friendly, whether it’s the “best” depends on your needs. For advanced photo editing, software like Adobe Photoshop offers more in-depth tools. However, for quick, easy, and aesthetically pleasing edits, Canva is excellent, especially for non-professionals.
Can You Edit Images with Layers on Canva?
Yes, Canva allows layering of elements. You can add multiple layers of images, text, and graphics. The layering tool enables you to arrange these elements forward or backward, creating a sense of depth or overlay.
Editing Out a White Background from an Image in Canva:
Use Background Remover: Canva Pro offers a “Background Remover” tool that can be used to remove white backgrounds from images easily.
Manual Adjustment: For non-Pro users, you can try manually adjusting the image’s transparency or overlaying it on a colored background to mask the white area.
FAQs: How to Edit Photos Like a Pro in Canva?
Q1: Can Canva replace professional photo editing software?
A1: While Canva is highly capable of a wide range of editing tasks, it may not fully replace professional software like Adobe Photoshop for advanced or highly specialized photo editing needs.
Q2: Are there any costs associated with using Canva?
A2: Canva offers a free version with a wide range of features. However, there is also a paid subscription (Canva Pro) that provides additional functionality, such as advanced editing tools, a broader selection of assets, and more storage space.
Q3: Can I use Canva for professional purposes, like business branding?
A3: Absolutely. Canva is equipped with features and templates suitable for professional branding purposes, including logo creation, business presentations, marketing materials, and more.
Q4: How does Canva’s Background Remover tool work?
A4: Canva’s Background Remover uses AI technology to automatically detect and remove the background from an image, which is particularly useful for creating professional-looking designs and product images.
Q5: Can I collaborate with others on a design in Canva?
A5: Yes, Canva offers collaboration features that allow multiple users to work on a design simultaneously, making it a great tool for team projects.
Q6: Does Canva offer resources for learning and improving design skills?
A6: Yes, Canva provides various tutorials, design courses, and resources through its website, aiding users in enhancing their design skills and making the most out of its features.
Final Thoughts:How to Edit Photos Like a Pro in Canva?
Canva emerges as an exemplary platform, characterized by its user-friendliness and multifaceted capabilities, catering adeptly to a diverse array of graphic design requirements. It is a commendable choice for tasks ranging from simple photo editing and social media content creation to more intricate graphic compositions and logo design. While it may not supplant advanced editing software for highly specialized tasks, Canva’s amalgamation of ease, comprehensive features, and accessibility positions it as an indispensable tool for regular design work and photo manipulation.